Lab CWRK1 — 첫 번째 Cowork 스킬 만들기
Copilot Cowork용 커스텀 Agent Skill을 만들고, 제품 안에서 스킬을 관리하며, SKILL.md를 직접 작성해 업로드하는 전 과정을 다룹니다.
▶ 한 줄 요약 — Agent Skill은 “언제, 어떻게” 특정 도메인 워크플로를 실행할지 Cowork에게 가르치는 구조화된 지침 파일입니다. 이 랩에서는 ① Customize 화면에서 스킬을 관리하고, ② 네이티브 Add skill 가이드 플로로 스킬을 만들고, ③ VS Code로 SKILL.md를 직접 작성해 업로드합니다.
이 글은 Microsoft 공식 Copilot Developer Camp의 Lab CWRK1 을 한국어로 옮긴 것입니다. 사전 준비는 Lab CWRK0를 먼저 완료하세요.
이 랩에서는 Copilot Cowork용 커스텀 Agent Skill을 만드는 방법, 제품 안에서 스킬을 관리하는 방법, 그리고 직접 만든 스킬을 게시하는 방법을 배웁니다.
큰 그림에서 Agent Skill은 Cowork에게 특정 도메인 워크플로를 언제·어떻게 실행할지 가르치는 구조화된 지침 파일입니다. 스킬은 일반적인 프롬프트가 아닙니다. 의도 신호(intent signals), 실행 가이드, 출력 기대치를 포함하고 있어, 주어진 요청에 대해 Cowork가 올바른 동작을 안정적으로 선택하고 실행할 수 있습니다.
이 랩을 마치면 다음을 할 수 있습니다.
- 스킬이 무엇이고 언제 커스텀 스킬을 만들어야 하는지 이해
- Customize 화면에서 기본 제공 스킬과 커스텀 스킬 관리
- 네이티브 Add skill 가이드 플로로 스킬 생성
- VS Code 등으로 스킬을 저수준에서 직접 작성·패키징·업로드
실습 1: Agent Skill이 무엇인지 이해하기
이 실습에서는 스킬에 대한 명확한 멘탈 모델을 세우고, 스킬이 Cowork 오케스트레이션에서 어디에 위치하는지, 플러그인과 어떻게 다른지 파악합니다.
1단계: Cowork에서 스킬의 역할 이해
Cowork는 스킬을 재사용 가능한 실행 패턴으로 사용합니다. 작업 중 Cowork는 대화 의도에 따라 하나 이상의 스킬을 로드한 뒤 단계별 워크플로를 실행합니다.
실무 관점에서 스킬은 Cowork가 다음을 하도록 돕습니다.
- 특수한 워크플로가 필요한 시점을 인식
- 즉흥적인 프롬프팅 대신 일관된 지침을 적용
- 반복되는 비즈니스 작업에 대해 예측 가능한 출력 생성
일회성 프롬프트와 달리 스킬은 여러 대화에서 재사용할 수 있는 지속 가능한 자산입니다.
2단계: 기본 제공 스킬 vs 커스텀 스킬
Cowork에는 문서, 커뮤니케이션, 일정, 엔터프라이즈 검색 등 일반적인 작업을 위한 기본 스킬이 이미 포함되어 있습니다. 다음과 같은 경우 커스텀 스킬을 만듭니다.
- 조직 고유의 프로세스 로직이 필요할 때
- 출력물에 일관된 서식이나 거버넌스가 필요할 때
- 명확한 문구로 도메인 워크플로를 트리거하고 싶을 때
커스텀 스킬은 기본 스킬을 보완합니다. Cowork의 모든 동작을 대체하는 것이 아니라, 여러분의 비즈니스 컨텍스트로 Cowork를 확장합니다.
3단계: 스킬과 플러그인 구분하기
| 구분 | 역할 | 선택 기준 |
|---|---|---|
| Skills | 동작과 워크플로 지침을 정의 | 주 목적이 가이드된 작업 실행일 때 |
| Plugins | 통합·커넥터·선택적 스킬 번들을 패키징 | 워크플로가 외부 시스템을 필요로 할 때 |
기본적으로 스킬 우선(skill-first) 접근을 택하고, 외부 시스템 연동이 필요할 때 플러그인/커넥터를 추가하세요.
실습 2: Customize 패널에서 스킬 관리하기
이 실습에서는 Cowork에서 사용 가능한 스킬을 직접 관리하는 방법을 살펴봅니다.
1단계: Customize 화면 열기
Microsoft 365 Copilot을 열고 1️⃣ Cowork로 전환한 뒤, 왼쪽 탐색에서 2️⃣ Customize를 선택합니다.
두 개의 탭이 보입니다.
- Plugins
- Skills
3️⃣ Skills를 선택하고 다음을 확인하세요.
- Your skills — 4️⃣ 직접 만들었거나 플러그인 패키지를 통해 획득한 스킬
- Built-in — 5️⃣ Cowork가 기본 제공하는 스킬
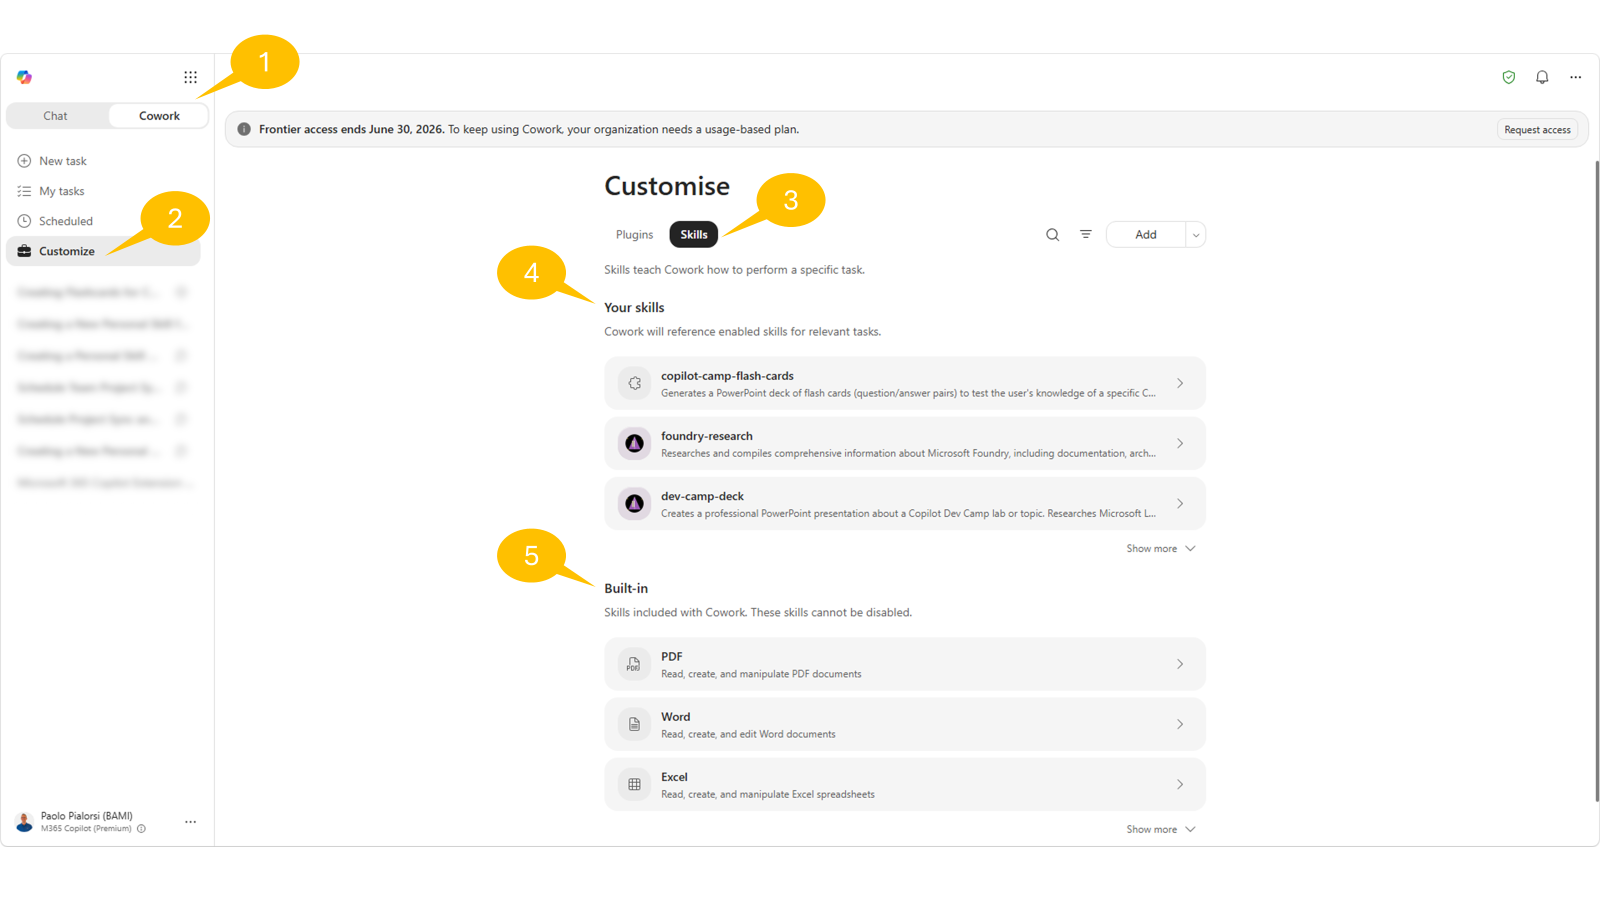
검색 상자와 원본(source) 필터로 결과를 좁혀 특정 스킬을 빠르게 찾을 수 있습니다. 스킬을 선택하면 상세 페이지가 열립니다.
직접 만든 스킬이 있다면 다음 관리 작업이 가능한지 확인해 보세요.
- 지침(instructions) 편집
- OneDrive에서 파일 위치 열기
- 스킬 다운로드
- 스킬 공유
- 스킬 삭제
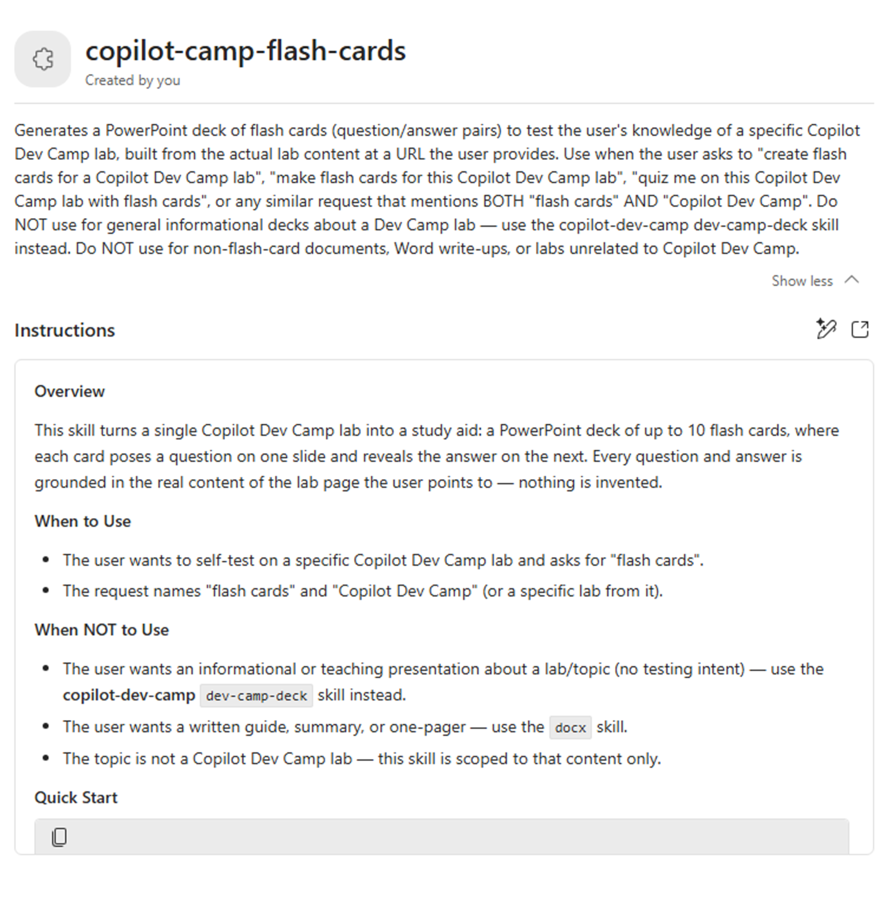
편집한 뒤에는 새 대화를 시작해 동작 변화를 테스트하세요.
실습 3: 네이티브 Add skill 플로로 스킬 만들기
이 실습에서는 Customize → Skills에 내장된 가이드형 작성 경험을 사용합니다.
1단계: Customize에서 가이드 생성 시작
Customize → Skills에서 Add → Create new를 선택합니다.
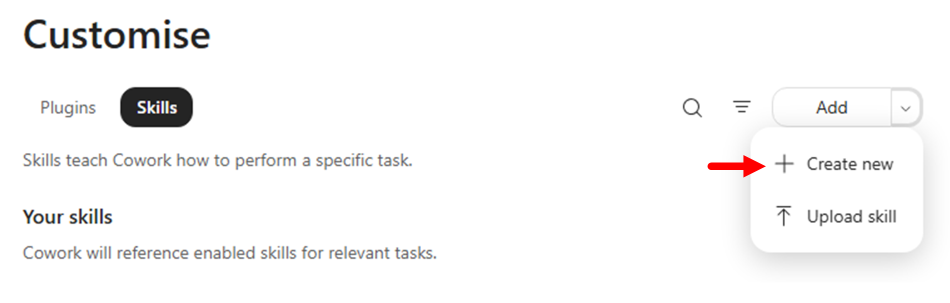
주의 — Copilot Cowork에서 커스텀 스킬을 작성하고 테스트하면 Copilot Credits가 소모됩니다.
Cowork가 스킬 정의를 수집하기 위한 가이드 대화를 엽니다. 이때 Cowork는 Skill management라는 이름의 네이티브 스킬을 사용해 새 스킬 생성 과정을 안내합니다.
이어서 Cowork가 스킬의 목적을 선택하라고 요청합니다. 선택지는 다음과 같습니다.
| 목적 | 설명 |
|---|---|
| Writing & drafting | 사용자의 어조·형식으로 반복되는 문서를 생성 |
| Summarizing & briefing | 회의·메일 스레드·문서·채널을 일관된 구조의 요약으로 압축 |
| Data & analysis | 데이터를 표준 레이아웃(트래커·대시보드·정기 지표 리포트)으로 정리 |
| Process automation | 자주 수행하는 다단계 루틴 실행 — 받은 편지함 분류, 회의 준비, 하루 마무리 등 |
| Describe another option | 목표를 자유롭게 서술 |
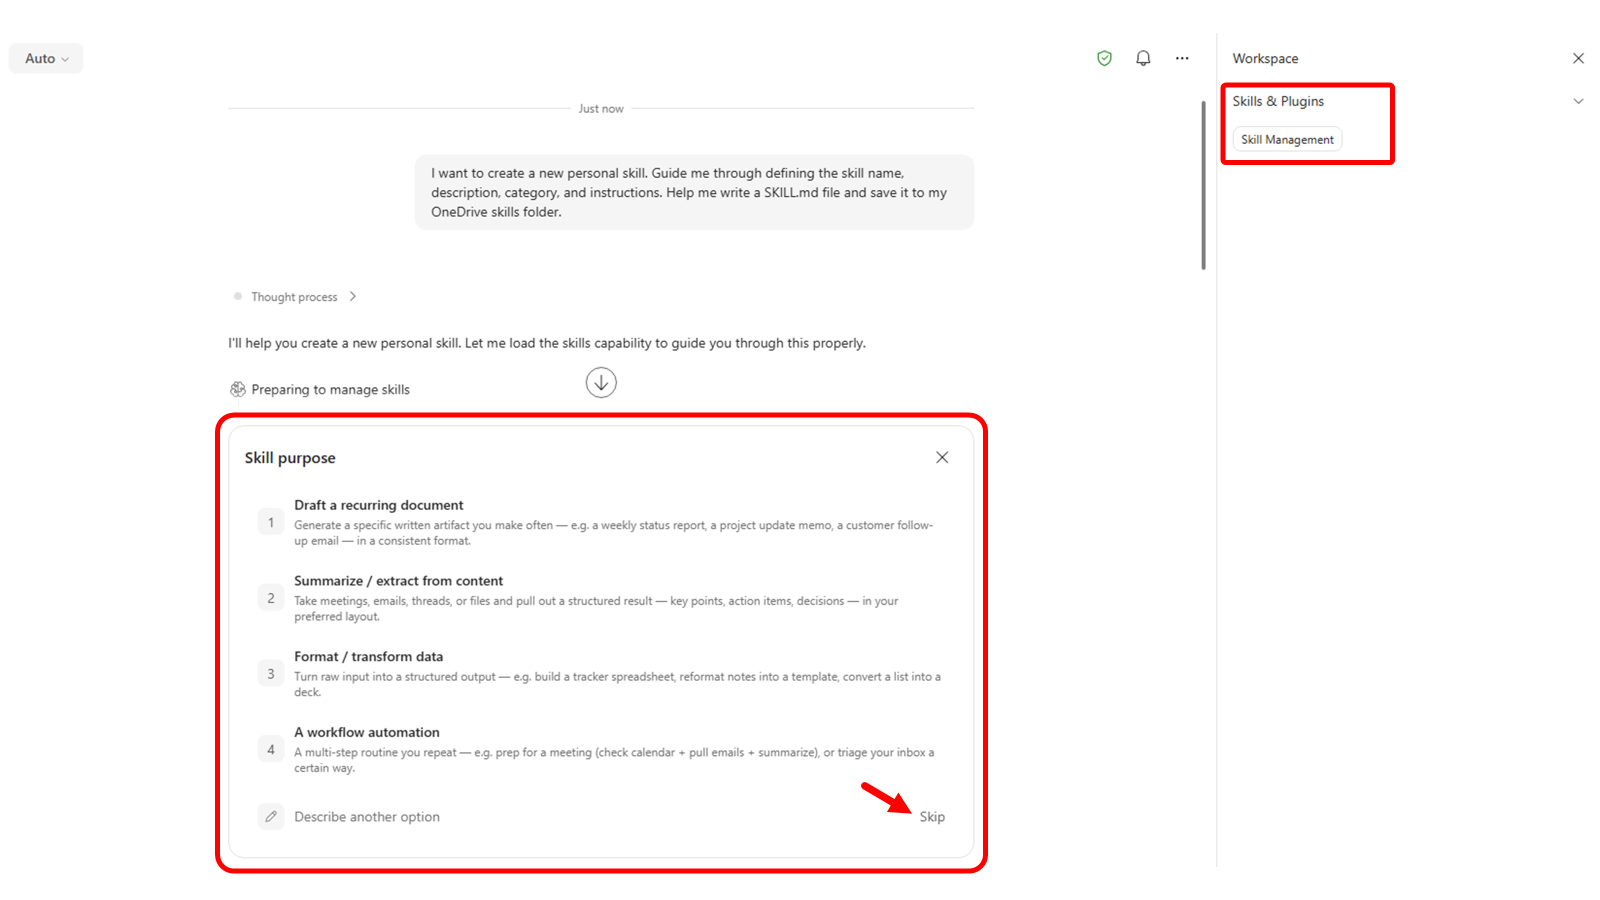
Skip을 선택하면 커스텀 스킬에 대한 지침을 자유 텍스트로 제공할 수 있습니다.
예를 들어 다음 텍스트를 사용해 보세요.
Generate a set of flash cards in PowerPoint to test my knowledge about a specific lab of the Copilot Dev Camp.

Trigger this skill whenver the prompt includes "Create flash cards for a Copilot Dev Camp lab" or something similar, but still referring to "flash cards" and "Copilot Dev Camp".

The result should be a PowerPoint deck with no more than 10 flash cards based on the actual content of the lab referenced, as a URL, by the user. If there is no URL of the lab, ask the user to provide it.

Name the skill "copilot-flash-cards".
Cowork가 요청을 처리하기 시작합니다. 스킬 이름을 확인하고, Cowork 프로필의 용량을 점검한 뒤, 스킬을 생성해 OneDrive for Business에 저장하고, 검증한 다음 품질 리포트를 만들어 줍니다.
참고 — 프로필당 최대 50개의 커스텀 스킬을 구성할 수 있습니다. 새 스킬을 만들 때 Cowork가 용량 한도에 도달했는지 확인합니다.
Cowork에서 바로 스킬을 테스트하고, 반복해서 다듬을 수 있습니다. 예를 들어 다음 프롬프트로 결과를 확인해 보세요.
Test it with the following URL: https://microsoft.github.io/copilot-camp/pages/extend-m365-copilot/11-mcp-app/
2단계: 저장 및 저장 위치 확인
스킬이 만족스러우면 현재 세션을 닫으면 됩니다. Cowork는 스킬을 OneDrive for Business의 다음 폴더에 저장했습니다.
/Documents/Cowork/skills/<name-of-the-skill>
OneDrive for Business를 탐색해 새 스킬 폴더의 내용을 확인해 보세요.
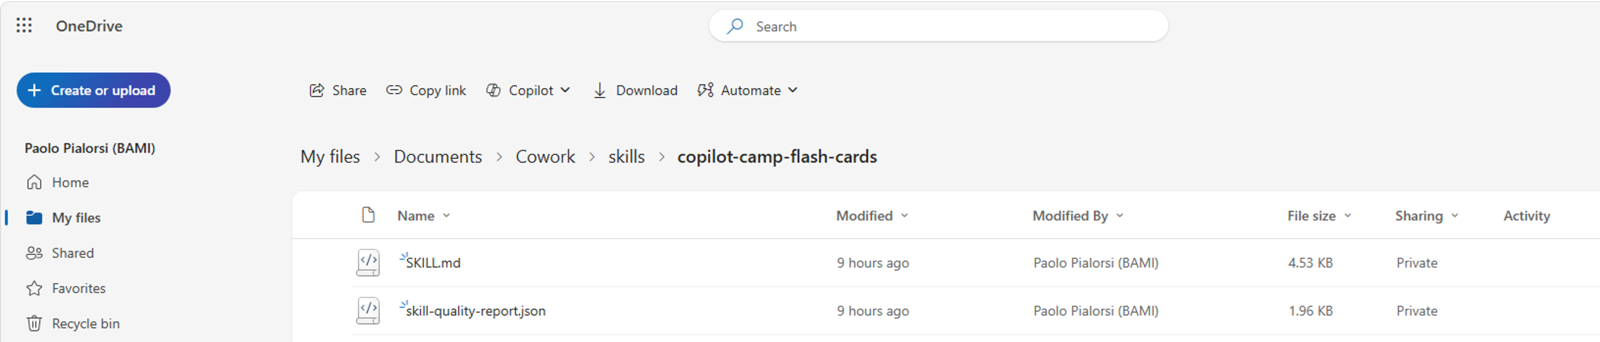
SKILL.md 정의 파일과 스킬 품질 리포트 JSON 파일이 저장됩니다새 Cowork 작업을 시작하고, 방금 만든 스킬을 트리거해야 하는 프롬프트를 테스트해 보세요.
Generate flash cards for the Copilot Dev Camp lab available at the following URL: https://microsoft.github.io/copilot-camp/pages/extend-m365-copilot/08-mcp-server/
오른쪽 사이드 패널에서 Skills를 열고, 실행 중 사용된 활성 스킬 목록에 커스텀 스킬이 나타나는지 확인합니다.
스킬이 활성화되지 않는다면, Cowork가 언제 이 스킬을 써야 하는지를 더 구체적으로 설명하도록 description을 다듬은 뒤 새 대화에서 다시 테스트하세요.
실습 4: VS Code로 스킬 직접 만들기
이 실습에서는 SKILL.md 파일을 직접 작성해 저수준에서 스킬을 만듭니다. 또는 인터넷에 이미 공개된 수많은 스킬 중 하나를 내려받아 Cowork에 업로드해도 됩니다. 예를 들어 Skills.sh 사이트에서 원하는 스킬을 검색해 보세요.
1단계: 스킬 폴더 생성 및 SKILL.md 작성
파일 시스템에 새 폴더를 만듭니다(예: weekly-status-mail). Visual Studio Code로 그 폴더를 열고, 탐색기에서 빈 SKILL.md 파일을 추가합니다.
파일을 열고 name과 description을 포함한 YAML 프런트매터를 추가합니다. 아래 템플릿을 기준으로 사용하세요.
---
name: weekly-status-mail
description: |
  Drafts a concise weekly status-update email to the user's team, covering open
  tasks, upcoming meetings, and action items, with light emoji formatting in the
  body. Use when the user asks to "draft my weekly status email", "write my weekly
  team update", "send my team the weekly status", "create my Monday status mail",
  "weekly status update for the team", or "recap this week for the team".
  Do NOT use for leadership or executive updates and cross-functional stakeholder
  communications — use stakeholder-comms instead. Do NOT use for one-off
  announcements or non-status emails — use the Outlook tools directly.
cowork:
  category: communication
  icon: Mail
---

## Overview

Produces a short, scannable weekly status email addressed to the user's team. It
gathers the user's open tasks, upcoming meetings, and outstanding action items
from Microsoft 365, then composes a friendly email with emoji section headers and
saves it as a **draft for review** — it never sends automatically.

## When to Use

- The user wants their recurring weekly status note to their team.
- The user asks to "recap this week" or "write my Monday update" for the team.
- The user wants open tasks, upcoming meetings, and action items rolled into one email.

## When NOT to Use

- Updates aimed at leadership, executives, or cross-functional stakeholders — use **stakeholder-comms** instead.
- One-off announcements, replies, or any non-status email — use the Outlook tools directly.
- A status *document* or spreadsheet rather than an email — use **docx** or **xlsx**.

## Quick Start

````
User: "Draft my weekly status email for the team"
1. Resolve the week window (today → next 7 days) and the team recipients.
2. Gather: open tasks, upcoming meetings, action items from M365.
3. Compose the email body with emoji section headers (concise bullets).
4. Save as a draft with CreateDraftMessage and show it for review.
````

## Core Instructions

### Step 1: Resolve recipients and time window
- Determine the week window: today through the next 7 days, in the user's local time zone.
- Resolve "the team" with people tools — `GetDirectReportsDetails` for the user's reports, or a team distribution list the user names. Never guess email addresses.
- If the team cannot be resolved, draft anyway with an empty To line and a clear `[Add team recipients]` note, and flag it for the user.

### Step 2: Gather open tasks
- Use `SearchM365` (sources: email, teams) for open/pending work, and `ListMessages` with `flagged_only=true` for follow-up flags.
- Include only items found in tool results. If none are found, write "Nothing outstanding to report."

### Step 3: Gather upcoming meetings
- Call `ListCalendarView` for the next 7 days; list notable meetings with day and time.
- Respect privacy: render `private`/`confidential` events as "Busy" or a time block — do not echo their subject lines.

### Step 4: Gather action items
- Pull action items from recent meeting recaps and recent email/Teams threads (`SearchM365`, recent `GetMeetingTranscript` when a relevant meeting exists).
- Attribute each item to an owner only when the source states it. Do not invent owners or due dates.

### Step 5: Compose and draft
- Build the body using the Output format below, with emoji section headers.
- Save the draft with `CreateDraftMessage` (To = resolved team, Subject = "Weekly Status — week of {date}").
- Present the draft to the user for review; do not send.

## Output

- **Format:** Email draft. Subject: `Weekly Status — week of {Mon DD}`.
- **Tone:** Warm, professional, concise. **Length:** roughly 120-200 words — scannable bullets, not paragraphs.
- **Body structure** (emoji headers, each section 2-5 bullets; omit a section's bullets and write "Nothing to report" when empty):

````
👋 Hi team — here's where things stand this week.

📋 Open Tasks
- {task} — {short status}

📅 Upcoming Meetings
- {Day, time} — {meeting}

✅ Action Items
- {action} — {owner, if known}

Thanks!
{User first name}
````

## Guardrails

- **Draft only — never auto-send.** Always use `CreateDraftMessage` and present the draft for the user to review and send themselves.
- **Ground every item in retrieved data.** If a search returns nothing for a section, say "Nothing to report" — never fabricate tasks, meetings, owners, or dates.
- **Resolve recipients via people tools**; never construct or guess email addresses. Confirm the team list with the user before they send.
- **Respect calendar privacy** — show private/confidential events as a time block, not their subject.
- **Keep it concise.** If a section has many items, surface the top few and note the rest exist rather than dumping everything.
- Use a light touch with emojis — section headers and the greeting, not every bullet.
이 스킬의 전체 소스 코드는 GitHub의 SKILL.md에서 내려받을 수 있습니다.
중요 체크포인트
name은 반드시 kebab-case로 작성name이 스킬 폴더 이름과 일치하는지 확인description에 트리거 시나리오를 명시적으로 기술
2단계: Cowork에 스킬 업로드
Cowork에서 Customize → Skills를 열고, Add 액션 아래의 Upload skill 옵션으로 패키지를 업로드합니다.
업로드 후 포함된 스킬이 Your skills에 나타나는지 확인하세요.
검증에 실패하면 다음 흔한 원인을 점검합니다.
| 증상 | 원인 |
|---|---|
| 업로드 실패 | SKILL.md 누락 |
| 파싱 오류 | 잘못된 YAML 프런트매터 |
| 이름 충돌 | name과 폴더 이름 불일치 |
| 이름 거부 | kebab-case 규칙 위반 |
3단계: 엔드투엔드 사용 테스트
새 대화를 시작하고, 업로드한 스킬이 활성화되어야 하는 프롬프트를 실행합니다.
Draft my weekly status email
사이드 패널에서 활성화 여부를 확인하고, 출력이 기대한 워크플로·형식을 따르는지 검증하세요.
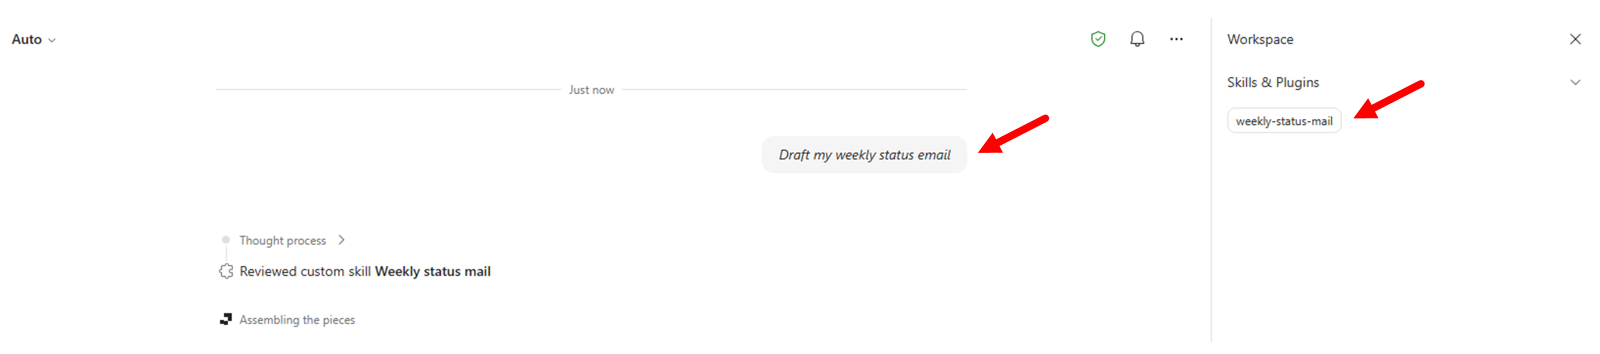
weekly-status-mail 스킬이 활성 스킬로 표시됩니다🎉 축하합니다!
Lab CWRK1 — 첫 번째 Cowork 스킬 만들기를 완료했습니다!
다음 랩에서는 Copilot Cowork를 위한 첫 번째 플러그인을 만들어 봅니다.
👉 Lab CWRK2 — 첫 번째 Cowork 플러그인 만들기