미션 08: Dataverse grounding으로 프롬프트 강화
정확한 응답을 위해 enterprise 데이터에 Agent를 grounding합니다
원문 번역 게시물 — 이 글은 Copilot Studio Agent Academy의 원문 🚨 Mission 08: Enhanced prompts with Dataverse grounding을 한글로 옮긴 것입니다. 원문 표현이 우선합니다.
🎯 미션 개요
다시 돌아온 것을 환영합니다, Operative. 여러분의 멀티 Agent 채용 시스템은 이제 가동 중이지만, data grounding이라는 중요한 향상이 필요합니다. AI 모델이 조직의 구조화된 데이터에 실시간으로 접근해 더 지능적인 결정을 내려야 합니다.
현재 Summarize Resume 프롬프트는 정적인 지식으로 동작합니다. 하지만 직무 역할 데이터베이스에 동적으로 접근해 정확하고 최신의 매칭을 제공할 수 있다면 어떨까요? 평가 기준을 하드코딩하지 않아도 이를 이해할 수 있다면 어떨까요?
이번 미션에서는 Dataverse grounding을 통해 custom prompt를 강화합니다. 즉, 프롬프트를 live data source에 직접 연결하는 것입니다. 이를 통해 Agent는 정적인 응답기에서 벗어나, 변화하는 비즈니스 요구에 적응하는 동적이고 데이터 중심적인 시스템으로 진화합니다.
이번 미션의 목표는 실시간 직무 역할 및 평가 기준 데이터를 이력서 분석 워크플로에 통합하여, 조직의 채용 요구사항을 항상 최신 상태로 반영하는 self-updating 시스템을 만드는 것입니다.
참고 — 이 강의의 스크린샷과 Copilot Studio 화면이 다르게 보인다면, 오른쪽 위의 New Experience를 끄고 여기서 사용하는 classic experience로 전환하세요.
🔎 학습 목표
이번 미션에서 배우게 될 내용은 다음과 같습니다.
- Dataverse grounding이 custom prompt를 어떻게 강화하는지
- 정적 지침 대신 data grounding을 사용해야 하는 시점
- live data를 동적으로 반영하는 프롬프트 설계 방법
- 직무 역할 매칭으로 Summarize Resume 플로를 강화하는 방법
🧠 프롬프트를 위한 Dataverse grounding 이해하기
Dataverse grounding을 사용하면 custom prompt가 요청을 처리할 때 Dataverse 테이블의 live data에 접근할 수 있습니다. 정적인 지침 대신, 프롬프트가 실시간 정보를 반영하여 더 근거 있는 결정을 내릴 수 있습니다.
Dataverse grounding이 중요한 이유
전통적인 프롬프트는 고정된 지침으로 동작합니다.
Match this candidate to these job roles: Developer, Manager, Analyst
Dataverse grounding을 사용하면 프롬프트가 현재 데이터를 참조합니다.
Match this candidate to available job roles from the Job Roles table,
considering current evaluation criteria and requirements
이 접근 방식은 다음과 같은 핵심 이점을 제공합니다.
- Dynamic updates: 프롬프트를 수정하지 않아도 직무 역할과 기준이 변경됨
- Consistency: 모든 Agent가 동일한 최신 data source를 사용함
- Scalability: 새로운 역할과 기준이 자동으로 사용 가능해짐
- Accuracy: 실시간 데이터로 현재 요구사항을 반영한 의사결정 가능
Dataverse grounding의 동작 방식
custom prompt에 Dataverse grounding을 활성화하면 다음과 같이 동작합니다.
- Data selection: 포함할 Dataverse 테이블과 열을 선택합니다. 또한 가져온 부모 레코드를 기준으로 시스템이 필터링할 관련 테이블도 선택할 수 있습니다.
- Context injection: 프롬프트가 가져온 데이터를 프롬프트 컨텍스트에 자동으로 포함합니다.
- Intelligent filtering: 필터를 제공하면 시스템이 현재 요청과 관련된 데이터만 포함합니다.
- Structured output: 프롬프트가 가져온 데이터를 참조하고 검색된 레코드를 추론하여 출력을 생성할 수 있습니다.
정적 방식에서 동적 방식으로: grounding의 장점
Mission 07에서 만든 현재 Summarize Resume 플로를 살펴보고, Dataverse grounding이 이를 어떻게 정적인 방식에서 동적인 지능형 시스템으로 바꾸는지 확인해 보겠습니다.
현재의 정적 접근 방식: 기존 프롬프트에는 하드코딩된 평가 기준과 미리 정해진 매칭 로직이 포함되어 있었습니다. 이 방식도 동작은 하지만, 새로운 직무 역할을 추가하거나 평가 기준을 변경하거나 회사의 우선순위가 바뀔 때마다 수동으로 업데이트해야 합니다.
Dataverse grounding으로의 전환: Dataverse grounding을 추가하면 Summarize Resume 플로는 다음을 수행하게 됩니다.
- 현재 직무 역할에 접근 — Job Roles 테이블에서 직접 조회
- live evaluation criteria 사용 — 정적인 설명 대신 실시간 기준 사용
- 정확한 매칭 제공 — 실시간 요구사항을 기준으로 판단
🎯 전용 프롬프트와 Agent 대화 비교
Mission 03에서는 Interview Agent가 후보자를 직무 역할에 매칭할 수 있다는 것을 확인했지만, 다음과 같이 복잡한 사용자 프롬프트가 필요했습니다.
Upload this resume, then show me open job roles,
each with a description of the evaluation criteria,
then use this to match the resume to at least one suitable
job role even if not a perfect match.
이 방식도 가능하지만, Dataverse grounding이 적용된 전용 프롬프트는 특정 작업에서 훨씬 큰 장점을 제공합니다.
전용 프롬프트의 핵심 장점
| 항목 | Agent 대화 | 전용 프롬프트 |
|---|---|---|
| Consistency | 사용자의 프롬프트 작성 능력에 따라 결과가 달라짐 | 매번 표준화된 처리 수행 |
| Specialization | 범용 추론은 비즈니스 맥락을 놓칠 수 있음 | 비즈니스 로직에 맞춰 최적화된 purpose-built 방식 |
| Automation | 사람의 상호작용과 해석이 필요함 | 구조화된 JSON 출력으로 자동 트리거 가능 |
⚙️ 레코드 검색 설정 이해하기
프롬프트에 Dataverse grounding을 구성할 때는 Record Retrieval 설정을 이해하는 것이 매우 중요합니다. 이 설정은 AI 모델에 제공되는 데이터의 양을 제어합니다.
record retrieval이란?
record retrieval은 프롬프트가 Dataverse knowledge source(테이블)에서 최대 몇 개의 레코드를 가져와 AI 모델로 전송되는 프롬프트 컨텍스트에 포함할 수 있는지를 결정합니다.
record retrieval 구성: 적절한 균형 찾기
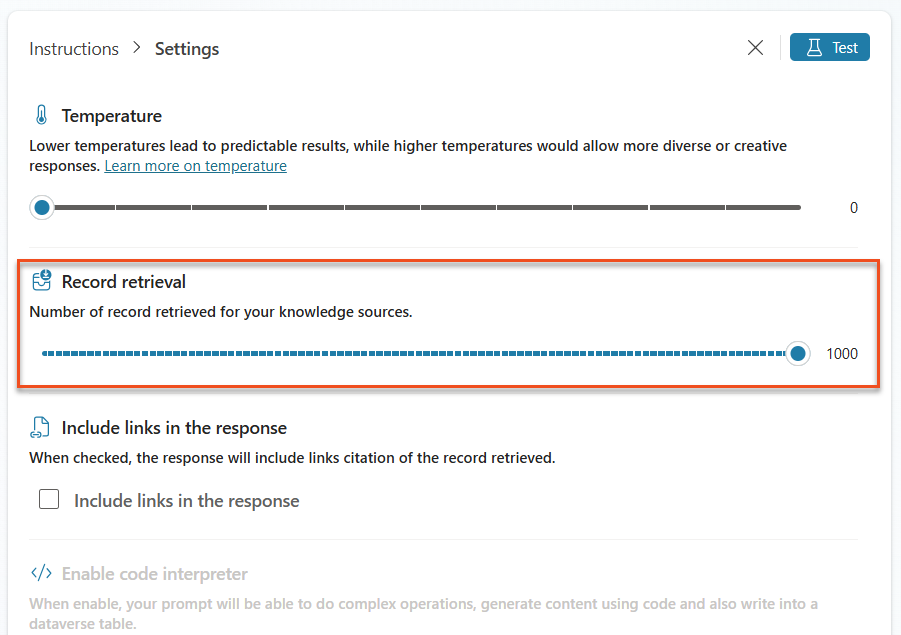
Dataverse에서 최대 1,000개의 레코드를 가져올 수 있지만, 이 설정을 언제 어떻게 조정할지 이해하는 것은 최적의 프롬프트 성능을 위해 중요합니다. 기본 제한은 30개이며 최대는 1000개로, 적절한 필터링이 있다면 대부분의 시나리오에 적합합니다. 가져오는 각 레코드는 모델의 컨텍스트 윈도우에서 토큰을 소비하므로 비용, 처리 시간, 응답 품질에 직접적인 영향을 줍니다.
Dataverse grounding은 대규모 데이터셋을 프롬프트 안에서 직접 처리하도록 설계되지 않았습니다. 한도를 1,000으로 높이더라도 수천 개의 레코드를 다루는 경우에는 올바른 해답이 아닐 수 있습니다. 핵심은 AI 모델에 도달하기 전에 filtering을 전략적으로 사용해 데이터셋을 줄이는 것입니다. 상태, 날짜 범위, 카테고리 또는 기타 관련 기준으로 항상 필터링하여 가장 중요한 레코드만 포함되도록 하세요.
🧪 Lab 8 - 프롬프트에 Dataverse grounding 추가하기
이제 이력서 분석 기능을 업그레이드할 시간입니다! 기존 Summarize Resume 플로를 동적인 직무 역할 매칭으로 강화해 보겠습니다.
이 미션을 완료하기 위한 사전 준비
-
다음이 필요합니다.
- Mission 07을 완료하고 이력서 분석 시스템이 준비되어 있어야 합니다.
- test Resumes에서 sample resume 문서를 내려받아 두어야 합니다.
8.1 프롬프트에 Dataverse grounding 추가하기
Mission 07에서 만든 Summarize Resume 프롬프트를 기반으로 작업합니다. 현재는 단순히 이력서를 요약하지만, 이제 Dataverse에 현재 존재하는 직무 역할로 grounding하여 항상 최신 상태를 유지하게 만듭니다.
먼저 grounding에 사용할 Dataverse 테이블을 살펴보겠습니다.
-
Power Apps로 이동한 다음, 탐색 모음 오른쪽 위의 Environment switcher를 사용해 환경을 선택합니다.
-
Tables를 선택하고 Job Roles 테이블을 찾습니다.
-
grounding에 사용할 핵심 열을 검토합니다.
Column 용도 Job Role Number 역할 매칭을 위한 고유 식별자 Job Title 역할의 표시 이름 Description 역할 요구사항 상세 정보 -
같은 방식으로 Evaluation Criteria 테이블 같은 다른 테이블도 검토합니다.
8.2 프롬프트에 Dataverse grounding 데이터 추가하기
-
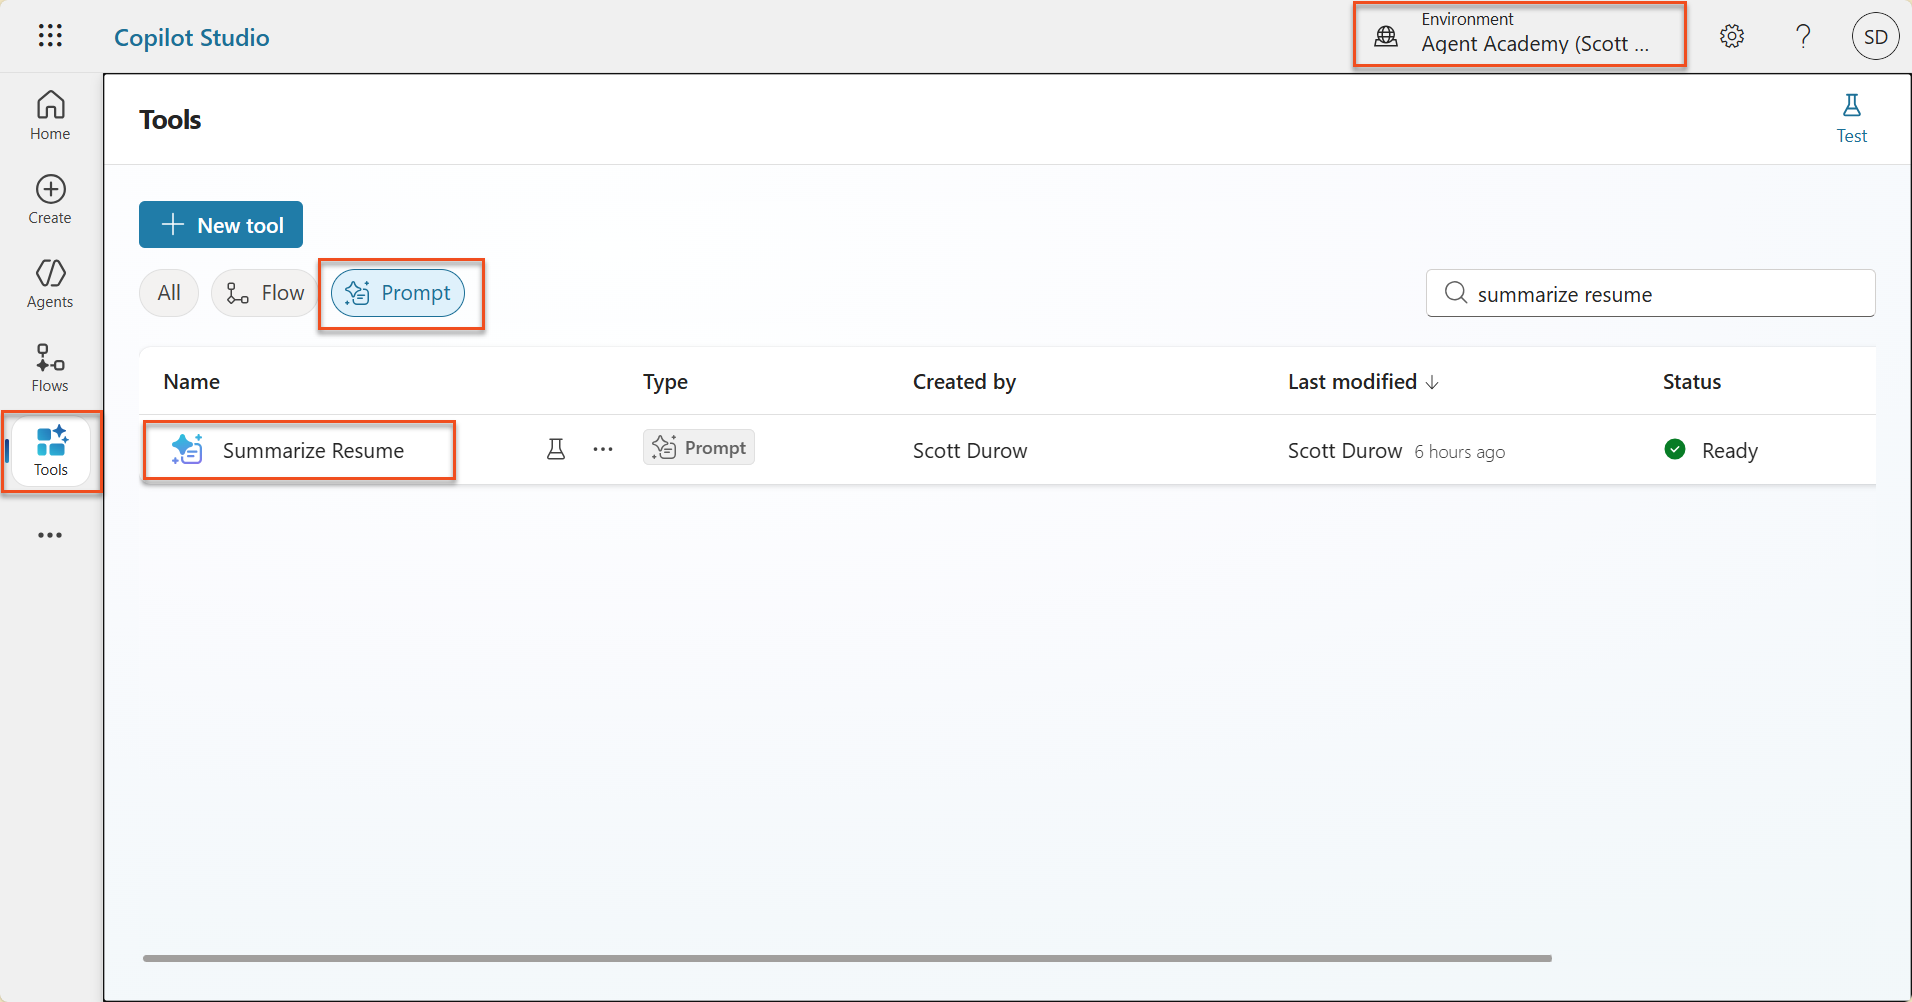
Copilot Studio로 이동한 다음, 탐색 모음 오른쪽 위의 Environment switcher를 사용해 환경을 선택합니다.
-
왼쪽 탐색 메뉴에서 Tools를 선택합니다.
-
Prompt를 선택하고 Mission 07에서 만든 Summarize Resume 프롬프트를 찾습니다.
-
프롬프트를 수정하려면 Edit를 선택한 다음, 아래의 향상된 버전으로 교체합니다.
중요 — Resume 및 Cover Letter 매개변수는 반드시 매개변수로 유지하세요.
You are tasked with extracting key candidate information from a resume and cover letter to facilitate matching with open job roles and creating a summary for application review. ### Instructions: 1. **Extract Candidate Details:** - Identify and extract the candidate's full name. - Extract contact information, specifically the email address. 2. **Analyze Resume and Cover Letter:** - Review the resume content to identify relevant skills, experience, and qualifications. - Review the cover letter to understand the candidate's motivation and suitability for the roles. 3. **Match Against Open Job Roles:** - Compare the extracted candidate information with the requirements and descriptions of the provided open job roles. - Use the job descriptions to assess potential fit. - Identify all roles that align with the candidate's cover letter and profile. You don't need to assess perfect suitability. - Provide reasoning for each match based on the specific job requirements. 4. **Create Candidate Summary:** - Summarize the candidate's profile as multiline text with the following sections: - Candidate name - Role(s) applied for if present - Contact and location - One-paragraph summary - Top skills (8–10) - Experience snapshot (last 2–3 roles with outcomes) - Key projects (1–3 with metrics) - Education and certifications - Availability and work authorization ### Output Format Provide the output in valid JSON format with the following structure: { "CandidateName": "string", "Email": "string", "MatchedRoles": [ { "JobRoleNumber": "ppa_jobrolenumber from grounded data", "RoleName": "ppa_jobtitle from grounded data", "Reasoning": "Detailed explanation based on job requirements" } ], "Summary": "string" } ### Guidelines - Extract information only from the provided resume and cover letter documents. - Ensure accuracy in identifying contact details. - Use the available job role data for matching decisions. - The summary should be concise but informative, suitable for quick application review. - If no suitable matches are found, indicate an empty list for MatchedRoles and explain briefly in the summary. ### Input Data Open Job Roles (ppa_jobrolenumber, ppa_jobtitle): /Job Role Resume: {Resume} Cover Letter: {CoverLetter} -
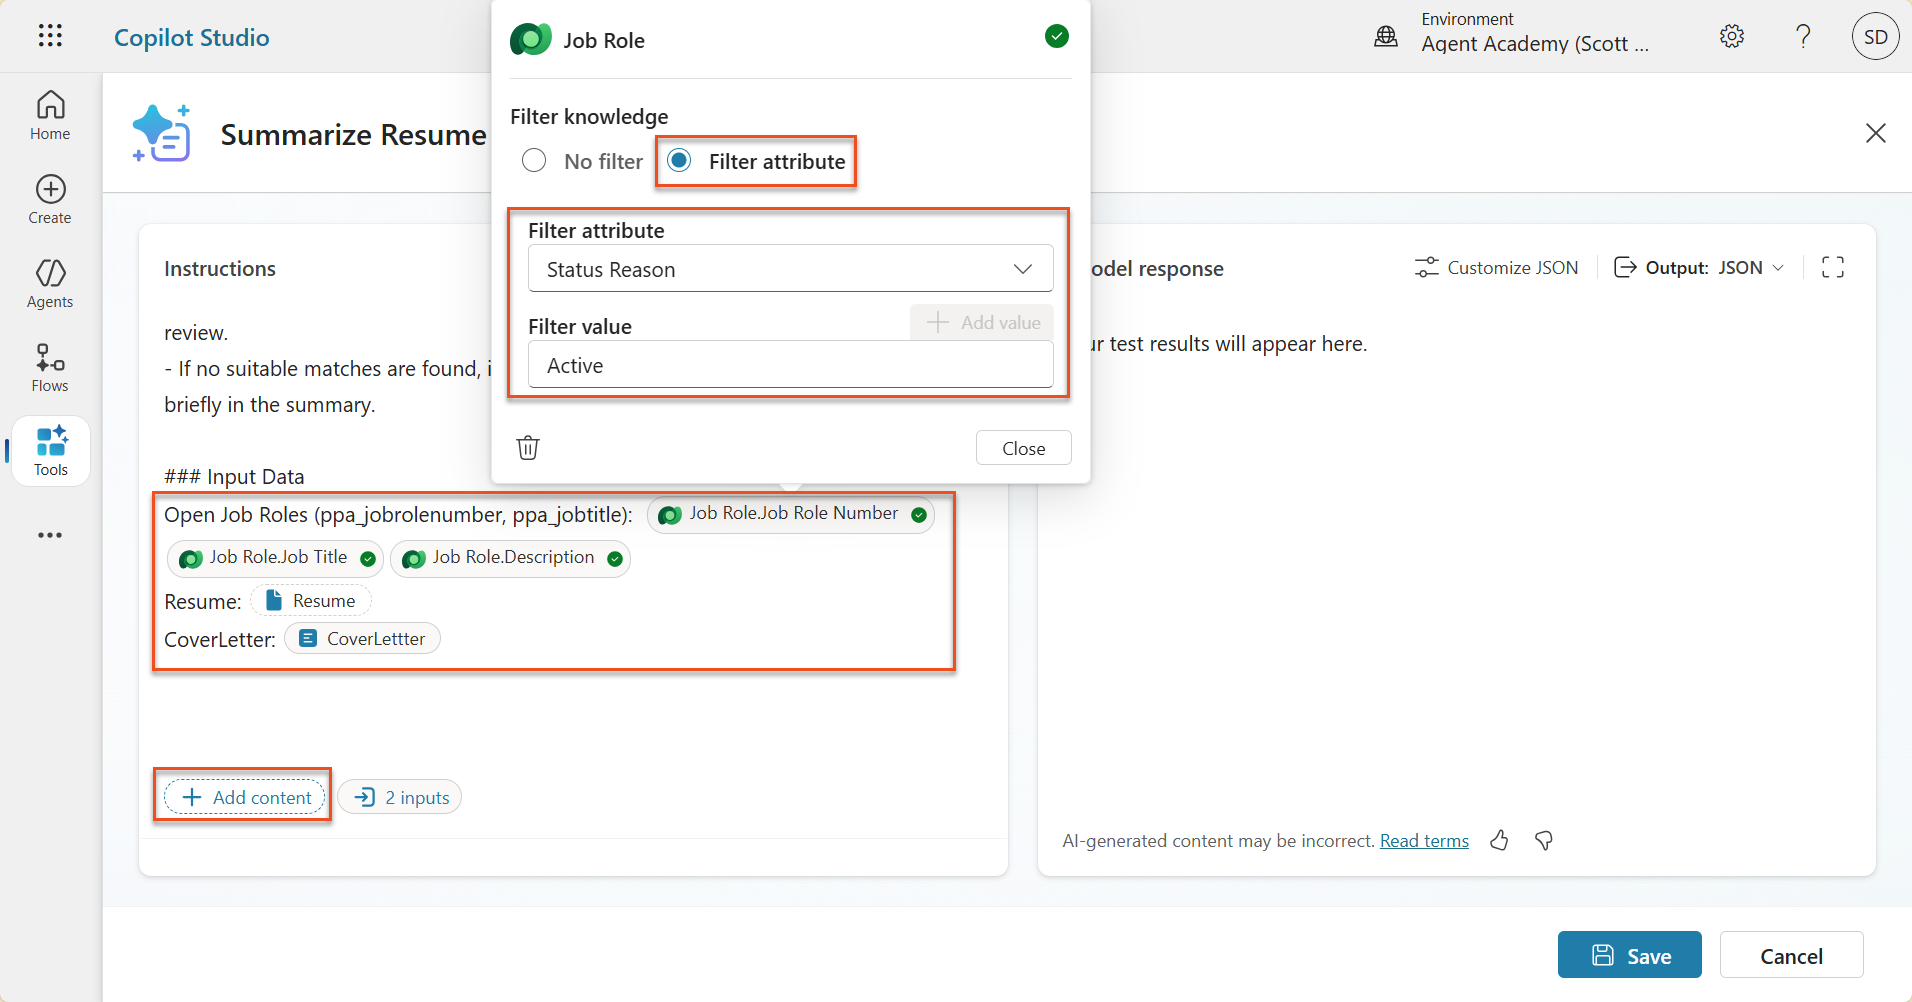
프롬프트 편집기에서 + Add content를 선택하고 Dataverse → Job Role로 이동해
/Job Role을 대체합니다. 아래 열을 선택한 후 Add를 선택합니다.-
Job Role Number
-
Job Title
-
Description
팁 — 테이블 이름을 직접 입력해 검색할 수 있습니다.
-
-
Job Role 대화 상자에서 Filter attribute를 선택하고, Status를 선택한 다음, Filter 값으로 Active를 입력합니다.
<div class="info-box note" markdown="1">
**팁** — 여기서 **Add value**를 사용해 입력 매개변수도 추가할 수 있습니다. 예를 들어 기존 레코드를 요약하는 프롬프트라면 Resume Number를 매개변수로 전달해 필터링할 수 있습니다.
</div>
-
다음으로 관련 Dataverse 테이블인 Evaluation Criteria를 추가합니다. 다시 + Add content를 선택하고 Job Roles를 찾은 뒤, Job Role의 열을 선택하는 대신 Job Role (Evaluation Criteria)를 펼쳐 아래 열을 선택하고 Add를 선택합니다.
-
Criteria Name
-
Description
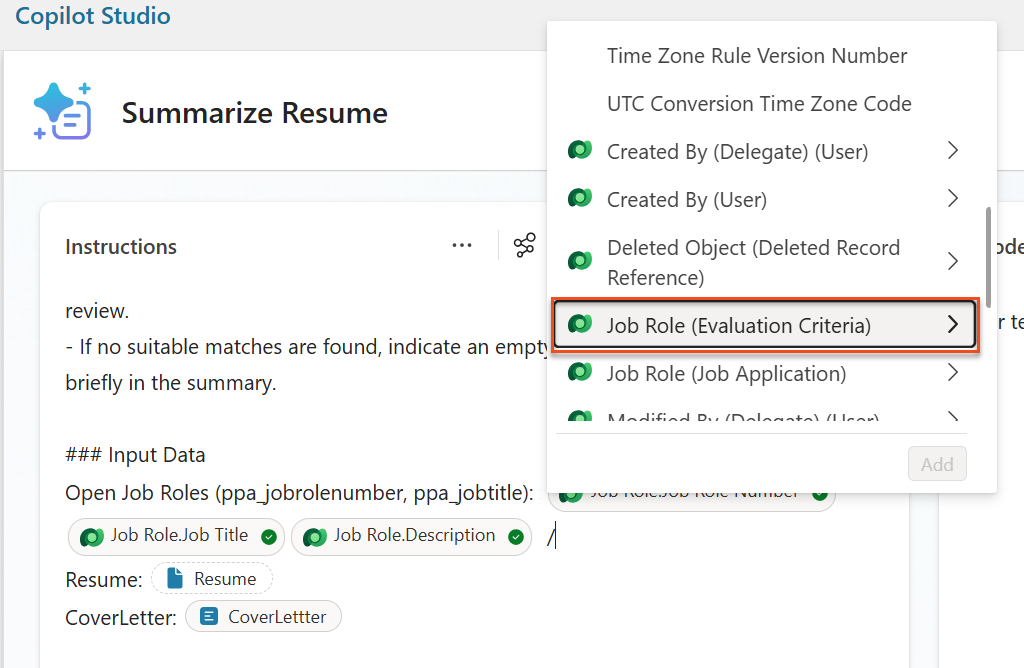
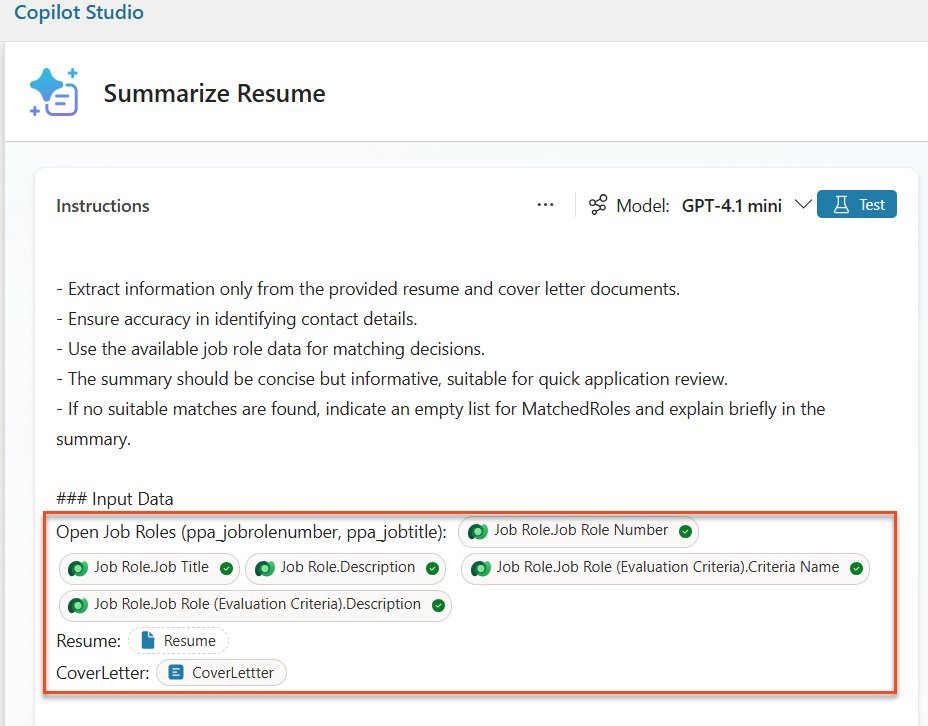
팁 — 먼저 Job Role을 선택한 뒤 메뉴에서 Job Role (Evaluation Criteria)로 이동해 관련 Evaluation Criteria를 선택하는 것이 중요합니다. 이렇게 해야 해당 Job Role과 연관된 레코드만 로드됩니다.
-
-
Instructions 창에서 점 세 개(…)를 선택한 다음 Settings를 선택합니다. Record retrieval을 1000으로 조정하면 최대 개수의 Job Roles와 Evaluation criteria를 프롬프트에 포함할 수 있습니다.
8.3 향상된 프롬프트 테스트하기
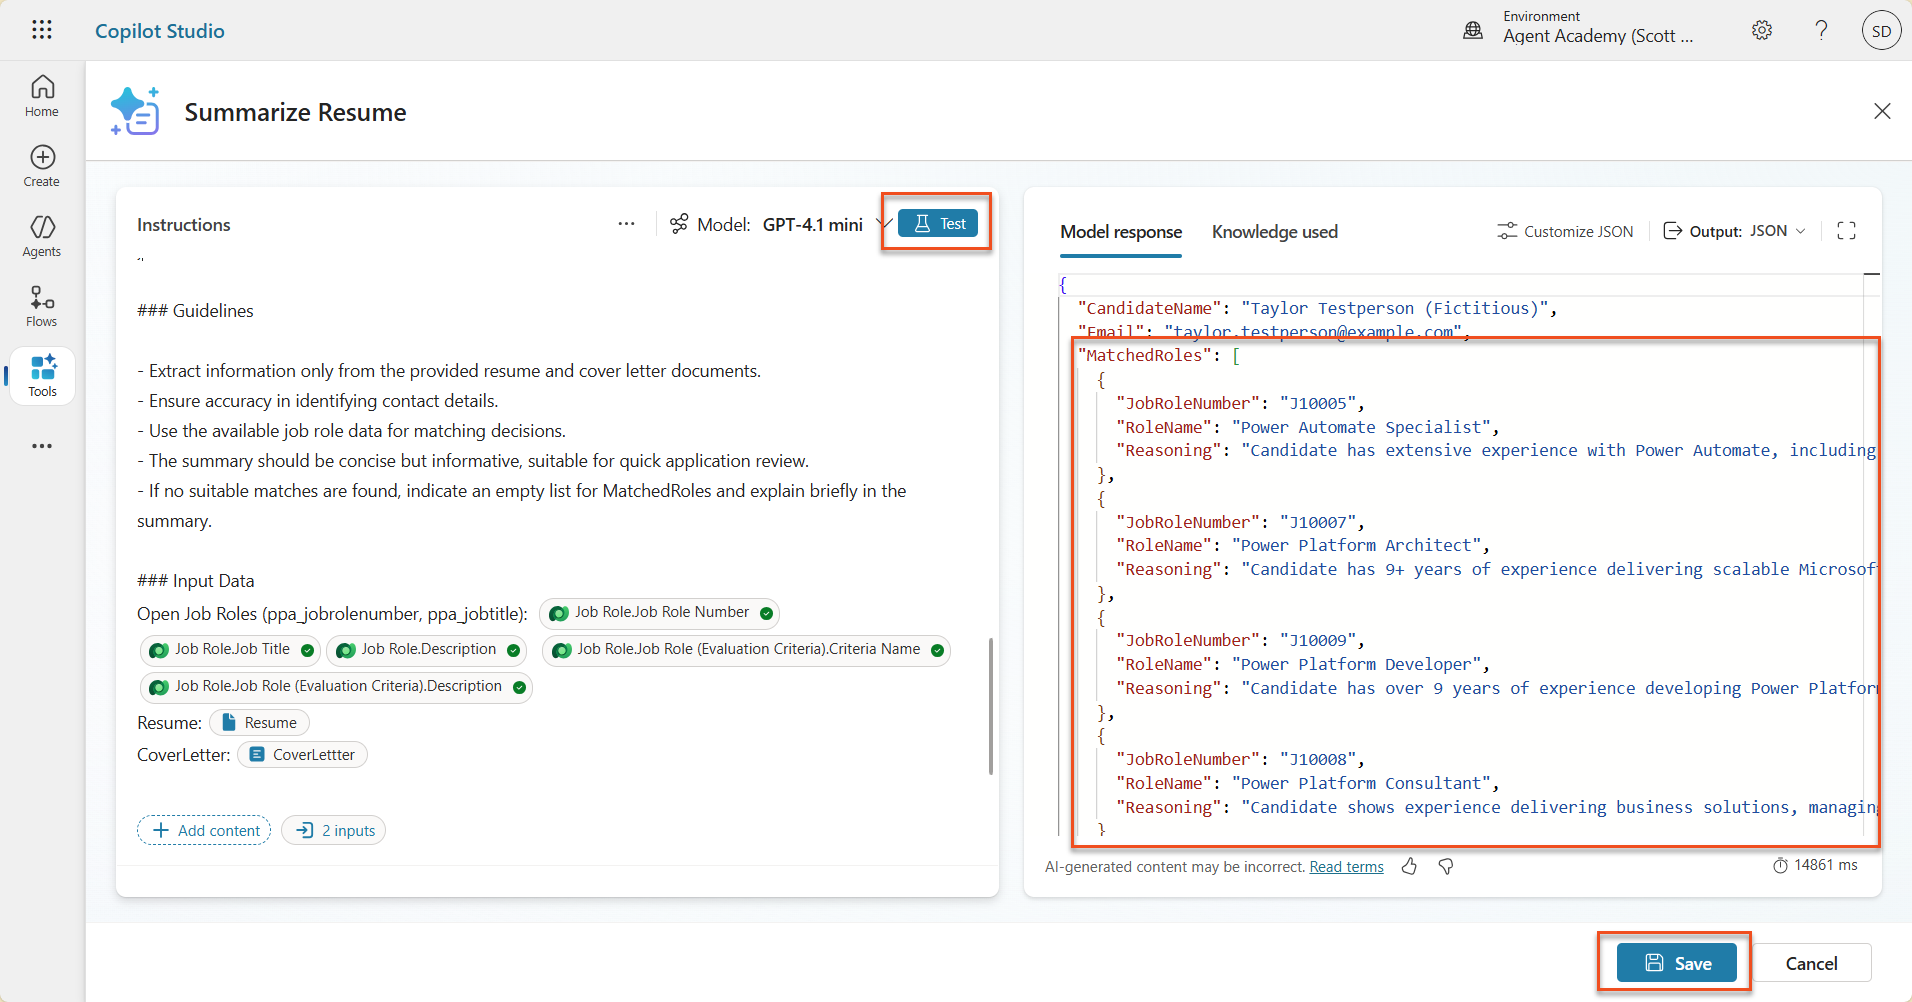
- Resume 매개변수를 선택하고 Mission 07에서 사용한 sample resume을 업로드합니다.
- Test를 선택합니다.
- 테스트가 실행되면 이제 JSON 출력에 Matched Roles가 포함되는 것을 확인합니다.
- Knowledge used 탭을 선택해, 실행 전에 프롬프트와 병합된 Dataverse 데이터를 확인합니다.
- 업데이트한 프롬프트를 Save합니다. 이제 기존 Summarize Resume Agent Flow가 이 프롬프트를 호출할 때 시스템이 자동으로 이 Dataverse 데이터를 포함합니다.
8.4 Job Application Agent Flow 추가하기
Application Intake Agent가 제안된 역할을 기준으로 Job Roles를 생성할 수 있도록 Agent Flow를 만들어야 합니다. Agent는 후보자가 관심 있는 제안 직무 역할마다 이 도구를 호출하게 됩니다.
팁: Agent Flow Expressions — 노드 이름과 expression 입력은 반드시 지시사항대로 정확히 따라야 합니다. expression이 이전 노드를 이름으로 참조하기 때문입니다. 빠르게 다시 보고 싶다면 Recruit의 Agent Flow 미션을 참고하세요.
-
Hiring Agent 안에서 Agents 탭을 선택하고 Application Intake Agent child agent를 엽니다.
-
Tools 패널에서 + Add → + New tool → Agent Flow를 선택합니다.
-
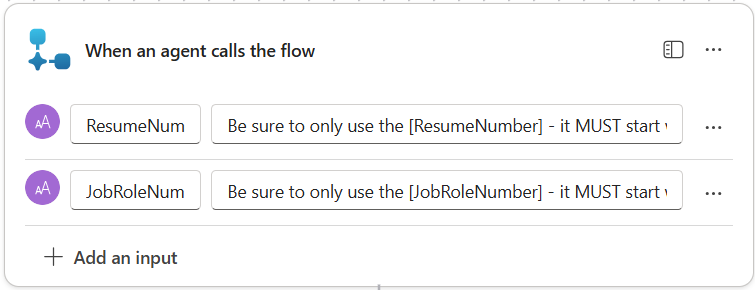
When an agent calls the flow 노드를 선택한 다음 + Add an input을 사용해 다음 매개변수를 추가합니다.
Type Name Description Text ResumeNumber반드시 [ResumeNumber]만 사용해야 하며, 값은 문자 R로 시작해야 합니다 Text JobRoleNumber반드시 [JobRoleNumber]만 사용해야 하며, 값은 문자 J로 시작해야 합니다
-
첫 번째 노드 아래의 + Insert action 아이콘을 선택하고 Dataverse를 검색한 뒤 See more를 선택하고 List rows 작업을 찾습니다.
-
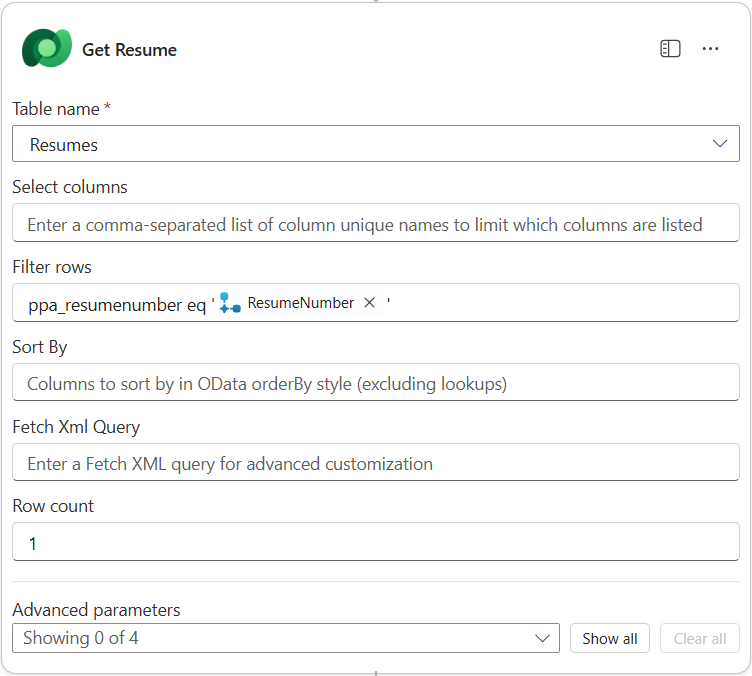
노드 이름을
Get Resume으로 Rename한 다음, 다음 매개변수를 설정합니다.Property How to Set Value Table name Select Resumes Filter rows Dynamic data (thunderbolt icon) ppa_resumenumber eq 'ResumeNumber'Select and replace ResumeNumber with When an agent calls the flow → ResumeNumberRow count Enter 1
-
이제 Get Resume 아래의 + Insert action 아이콘을 선택하고 Dataverse를 검색한 뒤 See more를 선택하고 List rows 작업을 찾습니다.
-
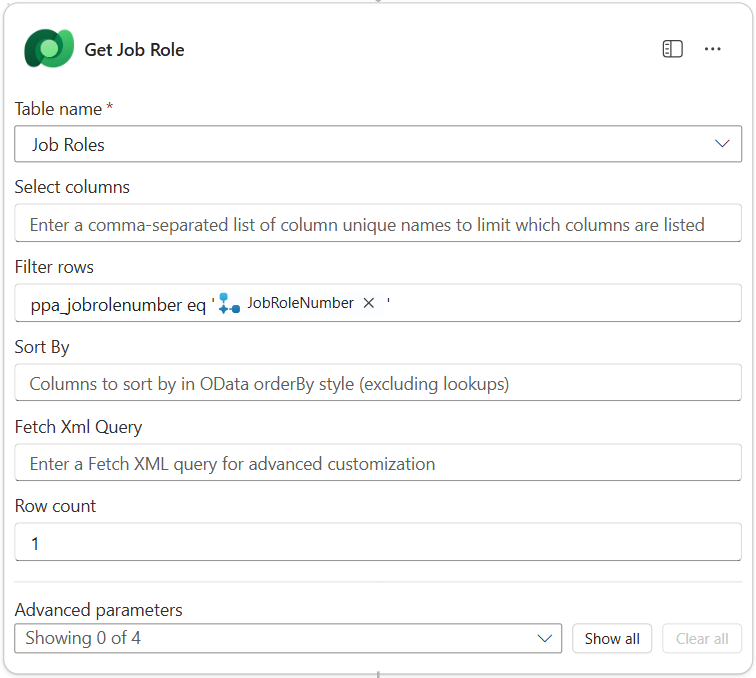
노드 이름을
Get Job Role로 Rename한 다음, 다음 매개변수를 설정합니다.Property How to Set Value Table name Select Job Roles Filter rows Dynamic data (thunderbolt icon) ppa_jobrolenumber eq 'JobRoleNumber'Select and replace JobRoleNumber with When an agent calls the flow → JobRoleNumberRow count Enter 1
-
이제 Get Job Role 아래의 + Insert action 아이콘을 선택하고 Dataverse를 검색한 뒤 See more를 선택하고 Add a new row 작업을 찾습니다.
-
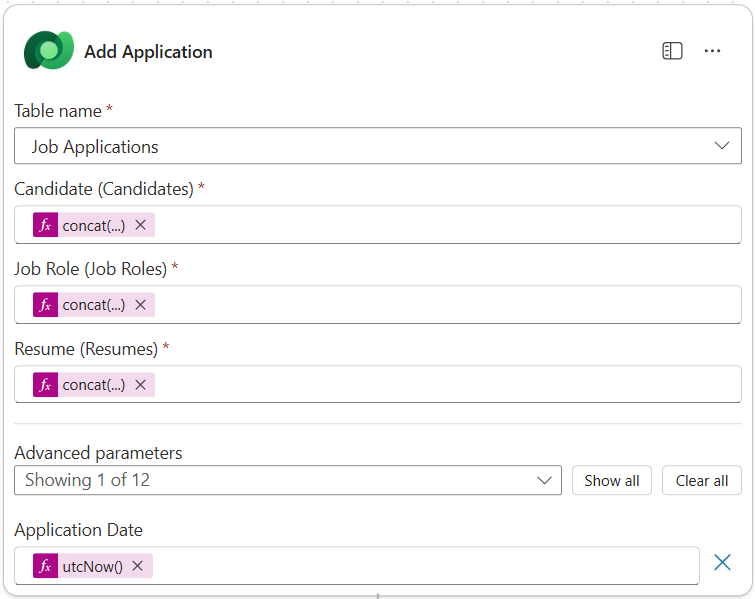
노드 이름을
Add Application으로 Rename한 다음, 다음 매개변수를 설정합니다.Property How to Set Value Table name Select Job Applications Candidate (Candidates) Expression (fx icon) concat('ppa_candidates/',first(outputs('Get_Resume')?['body/value'])?['_ppa_candidate_value'])Job Role (Job Roles) Expression (fx icon) concat('ppa_jobroles/',first(outputs('Get_Job_Role')?['body/value'])?['ppa_jobroleid'])Resume (Resumes) Expression (fx icon) concat('ppa_resumes/', first(outputs('Get_Resume')?['body/value'])?['ppa_resumeid'])Application Date (use Show all) Expression (fx icon) utcNow()
-
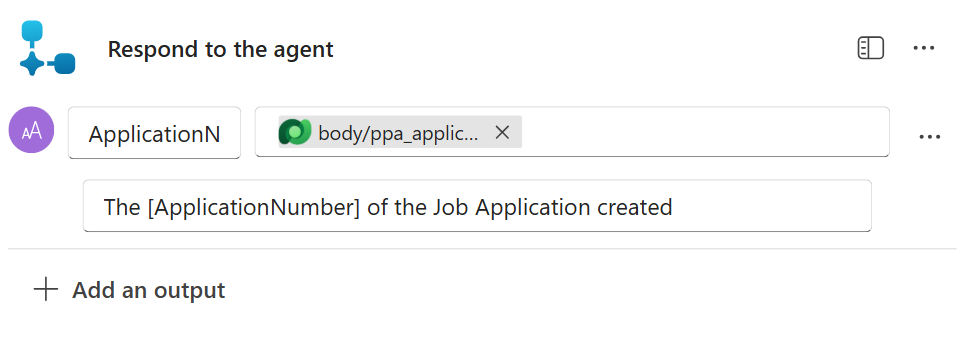
Respond to the agent 노드를 선택한 다음 + Add an output을 선택합니다.
Property How to Set Details Type Select TextName Enter ApplicationNumberValue Dynamic data (thunderbolt icon) Add Application → See More → Application Number Description Enter The [ApplicationNumber] of the Job Application created
-
오른쪽 위에서 Save draft를 선택합니다.
-
Overview 탭을 선택한 뒤 Details 패널에서 Edit를 선택합니다.
- Flow name:
Create Job Application - Description:
Creates a new job application when given [ResumeNumber] and [JobRoleNumber] - Save
- Flow name:
-
다시 Designer 탭을 선택하고 Publish를 선택합니다.
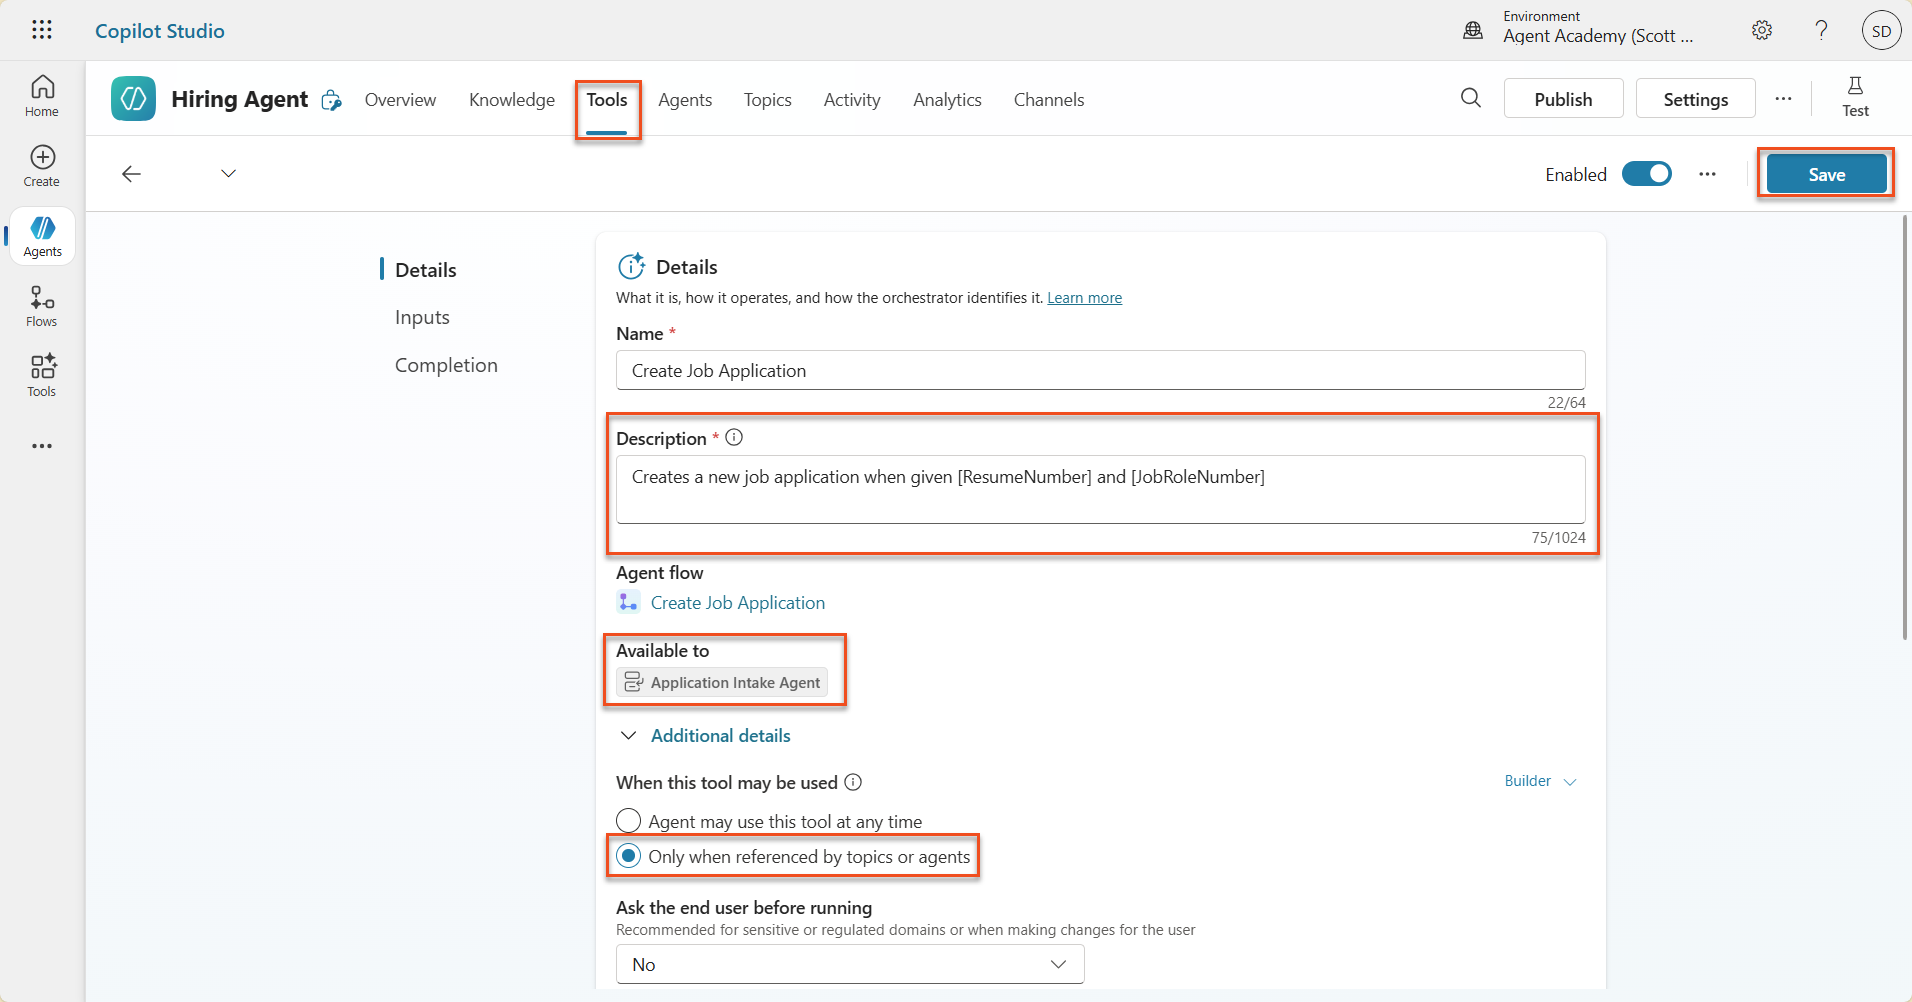
8.5 Agent에 Create Job Application 추가하기
이제 게시한 flow를 Application Intake Agent에 연결합니다.
-
Hiring Agent로 돌아가 Agents 탭을 선택합니다. Application Intake Agent를 연 다음 Tools 패널을 찾습니다.
-
+ Add를 선택합니다.
-
Flow 필터를 선택하고
Create Job Application을 검색합니다. Create Job Application flow를 선택한 다음 Add and configure를 선택합니다. -
다음 매개변수를 설정합니다.
Parameter Value Description Creates a new job application when given [ResumeNumber] and [JobRoleNumber]Additional details → When this tool may be used Only when referenced by topics or agents -
Save를 선택합니다.
8.6 Agent 지침 정의하기
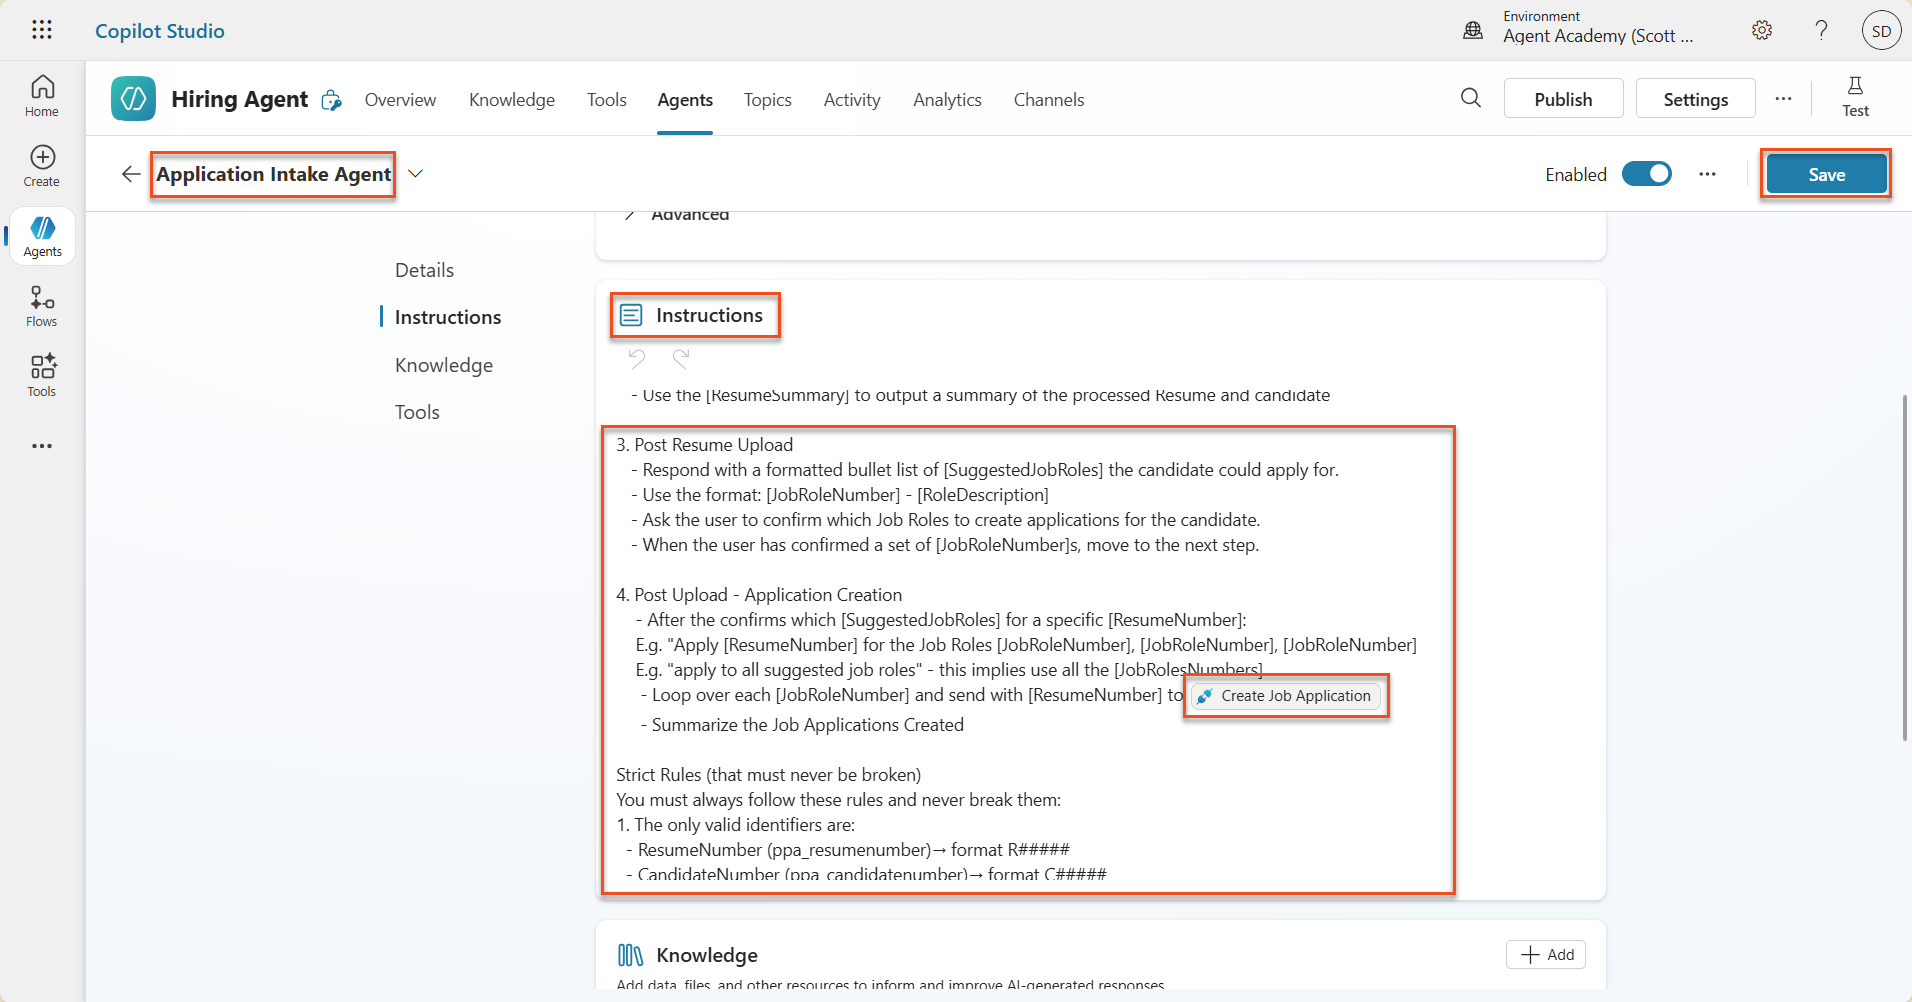
Job Application을 생성하려면 Agent에게 새 도구를 언제 사용해야 하는지 알려줘야 합니다. 여기서는 사용자가 어떤 제안 직무 역할에 지원할지 확인하도록 하고, 각 역할마다 도구를 실행하도록 지시합니다.
-
다시 Application Intake Agent로 들어가 Instructions 패널을 찾습니다.
-
Instructions 필드의 기존 지침 끝에 아래의 명확한 안내를 추가합니다.
3. Post Resume Upload - Respond with a formatted bullet list of [SuggestedJobRoles] the candidate could apply for. - Use the format: [JobRoleNumber] - [RoleDescription] - Ask the user to confirm which Job Roles to create applications for the candidate. - When the user has confirmed a set of [JobRoleNumber]s, move to the next step. 4. Post Upload - Application Creation - After the user confirms which [SuggestedJobRoles] for a specific [ResumeNumber]: E.g. "Apply [ResumeNumber] for the Job Roles [JobRoleNumber], [JobRoleNumber], [JobRoleNumber] E.g. "apply to all suggested job roles" - this implies use all the [JobRoleNumbers] - Loop over each [JobRoleNumber] and send with [ResumeNumber] to /Create Job Application - Summarize the Job Applications Created Strict Rules (that must never be broken) You must always follow these rules and never break them: 1. The only valid identifiers are: - ResumeNumber (ppa_resumenumber)→ format R##### - CandidateNumber (ppa_candidatenumber)→ format C##### - ApplicationNumber (ppa_applicationnumber)→ format A##### - JobRoleNumber (ppa_jobrolenumber)→ format J##### 2. Never guess or invent these values. 3. Always extract identifiers from the current context (conversation, data, or system output). -
지침에 슬래시(/)가 포함된 부분에서는
/뒤의 텍스트를 선택하고 Create Job Application 도구를 선택합니다. -
Save를 선택합니다.
팁: Generative Orchestration에서 여러 항목 반복 처리 — 이 지침은 generative orchestration이 여러 행을 반복 처리하며 어떤 단계와 도구를 사용할지 결정하는 기능을 활용합니다. Matched Job Roles가 자동으로 읽히고, Application Intake Agent는 각 행마다 실행됩니다. generative orchestration의 마법 같은 세계에 오신 것을 환영합니다!
8.7 Agent 테스트하기
-
Copilot Studio에서 Hiring Agent를 엽니다.
-
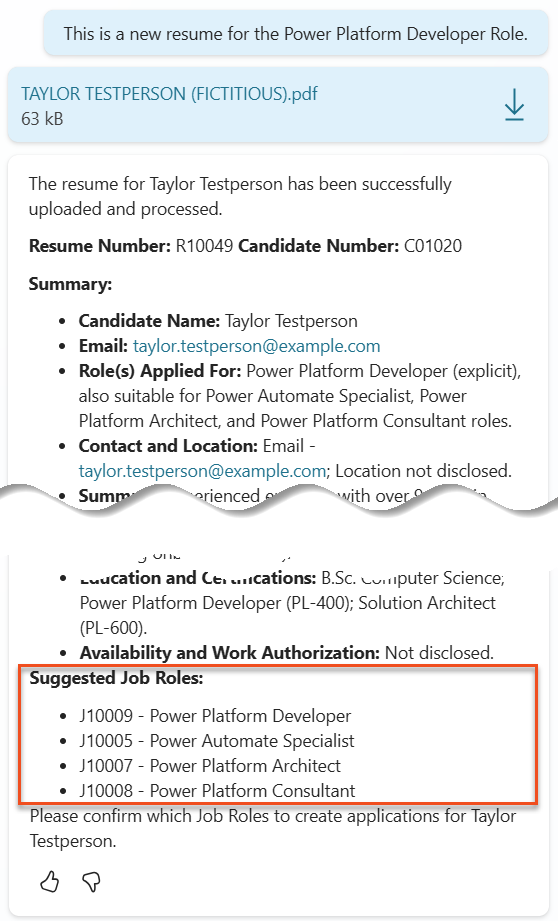
채팅에 sample resume을 Upload하고 다음을 입력합니다.
This is a new resume for the Power Platform Developer Role. -
Agent가 Suggested Job Roles 목록을 제공하는지 확인합니다. 각 항목에는 Job Role 번호가 포함됩니다.
-
그다음 이 Resume을 어떤 Job Application으로 추가할지 지정할 수 있습니다. 예시:
 "Apply for all of those job roles"
 "Apply for the J10009 Power Platform Developer role"
 "Apply for the Developer and Architect roles"
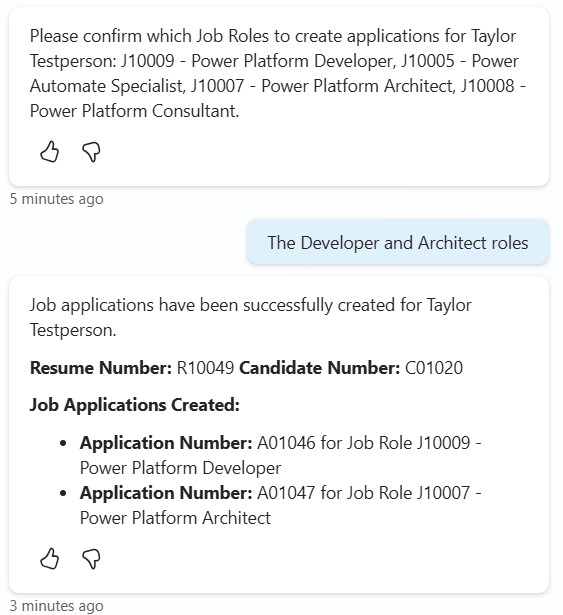
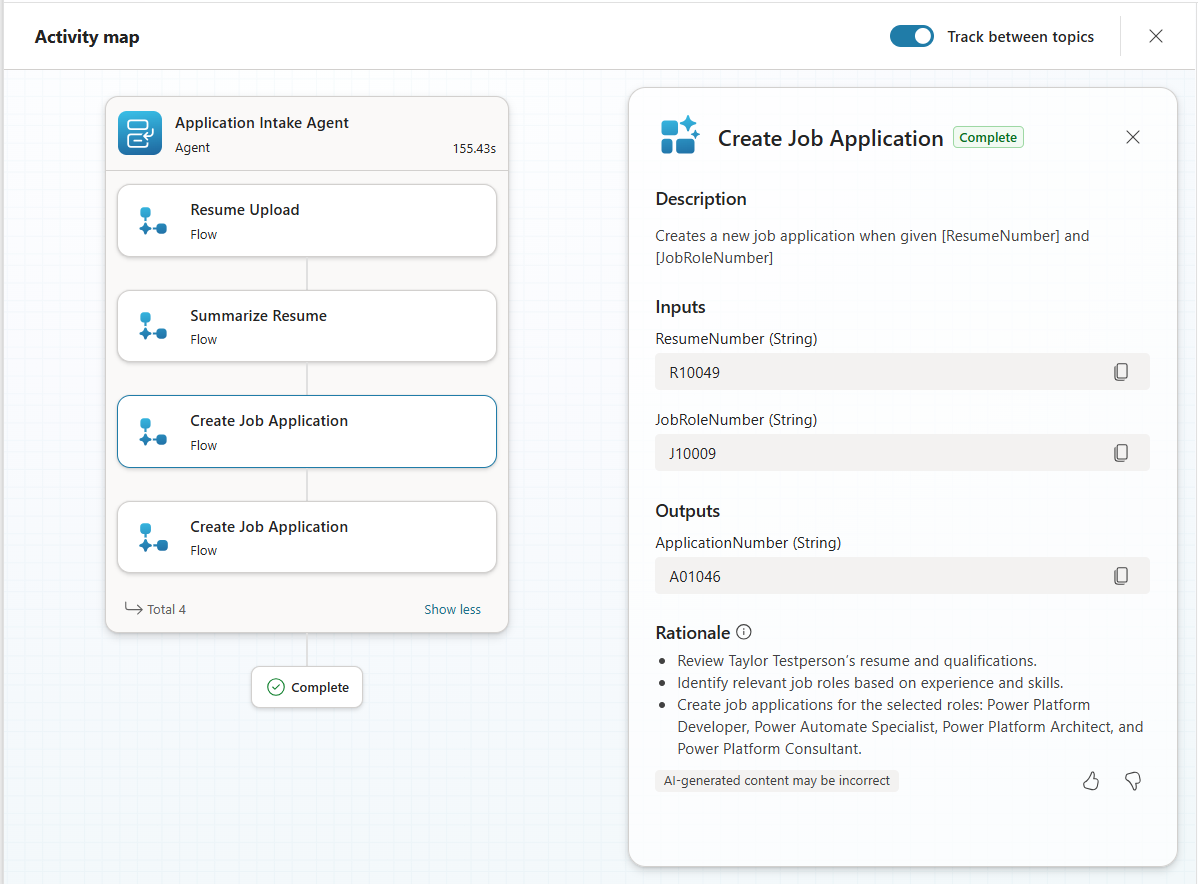
- 그러면 Create Job Application tool이 지정한 각 job role에 대해 실행됩니다. Activity map 안에서 요청한 각 Job Role마다 Create Job Application 도구가 실행되는 것을 볼 수 있습니다.
🎉 미션 완료
훌륭합니다, Operative! Operation Grounding Control이 이제 완료되었습니다. 동적인 data grounding으로 AI 기능을 성공적으로 강화하여, 진정으로 지능적인 채용 시스템을 구축했습니다.
이번 미션에서 달성한 내용은 다음과 같습니다.
✅ Dataverse grounding 숙달
이제 custom prompt를 live data source에 연결해 동적인 지능을 구현하는 방법을 이해하게 되었습니다.
✅ 향상된 이력서 분석
이제 Summarize Resume 플로가 실시간 직무 역할 데이터와 evaluation criteria에 접근해 정확한 매칭을 수행합니다.
✅ 데이터 기반 의사결정
이제 채용 Agent는 프롬프트를 수동으로 수정하지 않아도 변화하는 직무 요구사항에 자동으로 적응할 수 있습니다.
✅ Job Application 생성
향상된 시스템은 이제 Job Application을 생성할 수 있으며, 더 복잡한 워크플로 orchestration을 위한 준비가 되었습니다.
🚀 다음 단계: 다음 미션에서는 프롬프트 역량을 확장해 문서 생성을 구현하는 방법을 배우게 됩니다.
⏩ Mission 09로 이동: Document generation
📚 전술 자료
📖 Use your own data in a prompt
📖 Work with Dataverse in Copilot Studio
📖 AI Builder custom prompts overview
📖 Power Platform AI Builder documentation
📖 Training: Create AI Builder prompts using your own Dataverse data